
The Teachworks Toolkit
Jump to Section:
Availabilities
Note: Please do not change the Timezone on your Teachworks Profile! Even if you are not in Sydney, leave the timezone as Sydney Time!
How to Update Your Availabilities
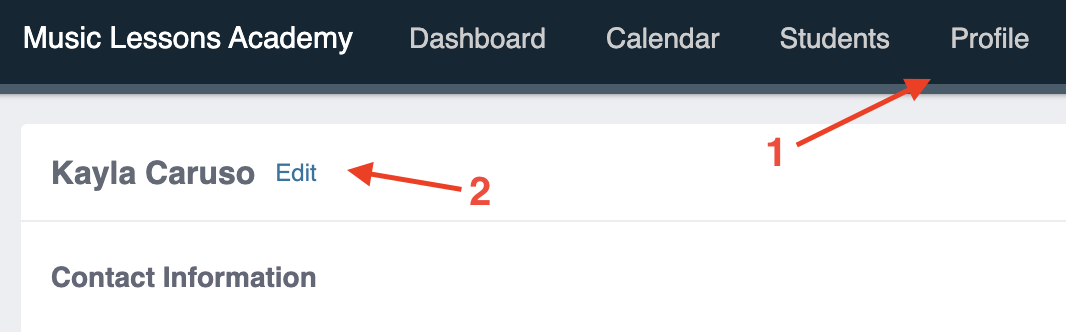
- On Teachworks, select "Profile" from the main menu
- Next to your name, select the blue "Edit" link
- At the availabilities heading, select "Add Row" to create a new available Day & Time
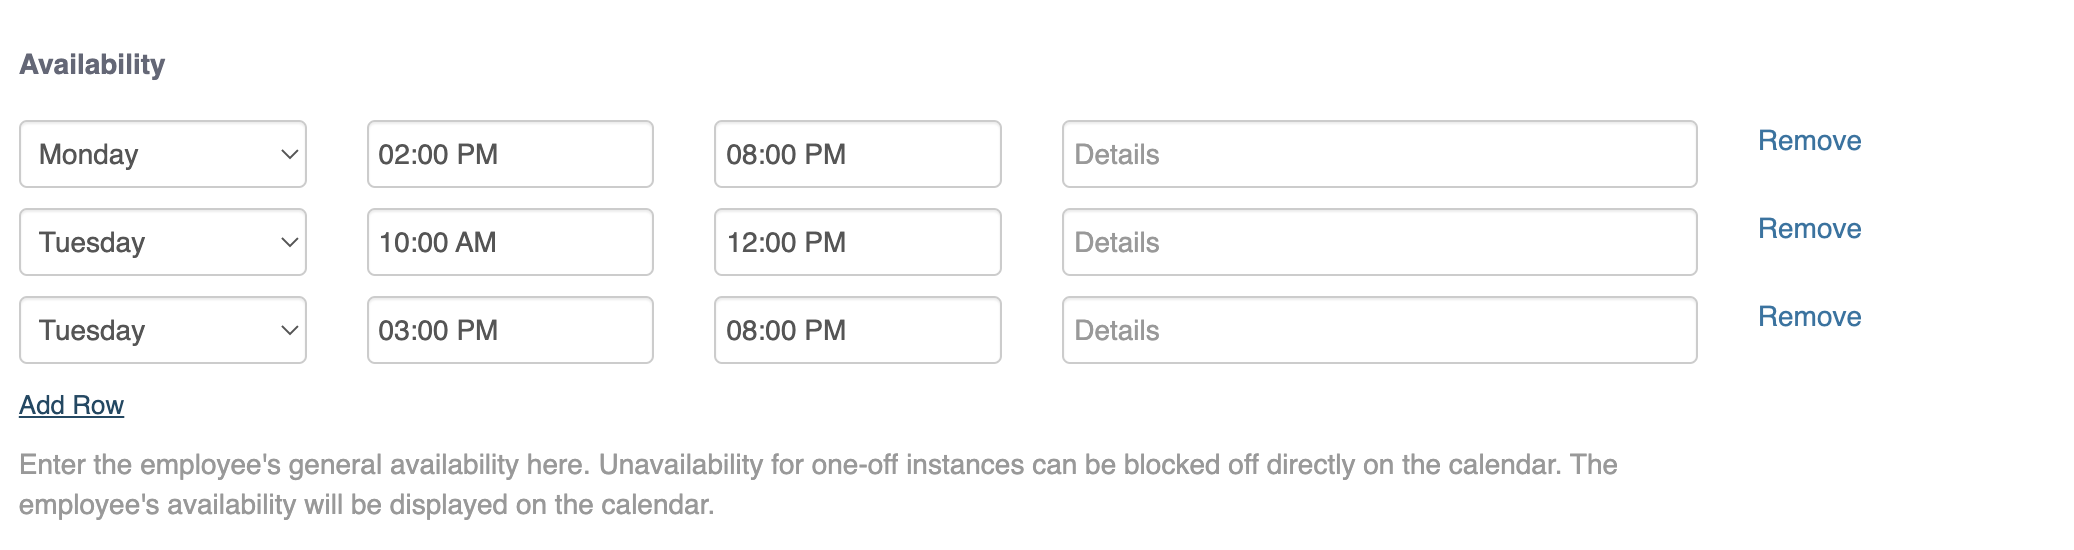
- Add a row for each Day & Time you are available.
- If you are available for two separate teaching sessions in a day (for example, in the morning then in the evening), you can create Two or more Rows for the same day. See the above example.
- When you are finished, scroll to the bottom of the page & press "SUBMIT"
Please note, once you update your availabilities, we assume they are effective immediately.
We can only schedule lessons based on your availability as stated here.
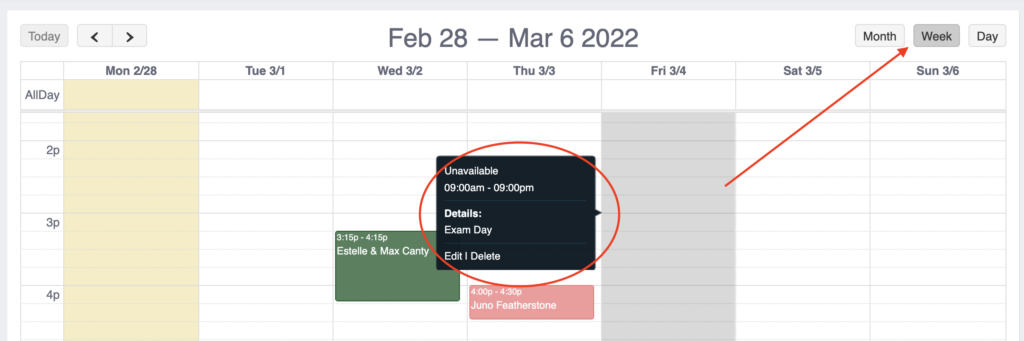
How to Add an Unavailability
Add an Unavailability following these steps if you have an upcoming once-off availability where you cannot teach.
For example, a health appointment/surgery, a university exam period, a holiday of less than a week.
- On Teachworks, select "Calendar", then "Add Unavailability"

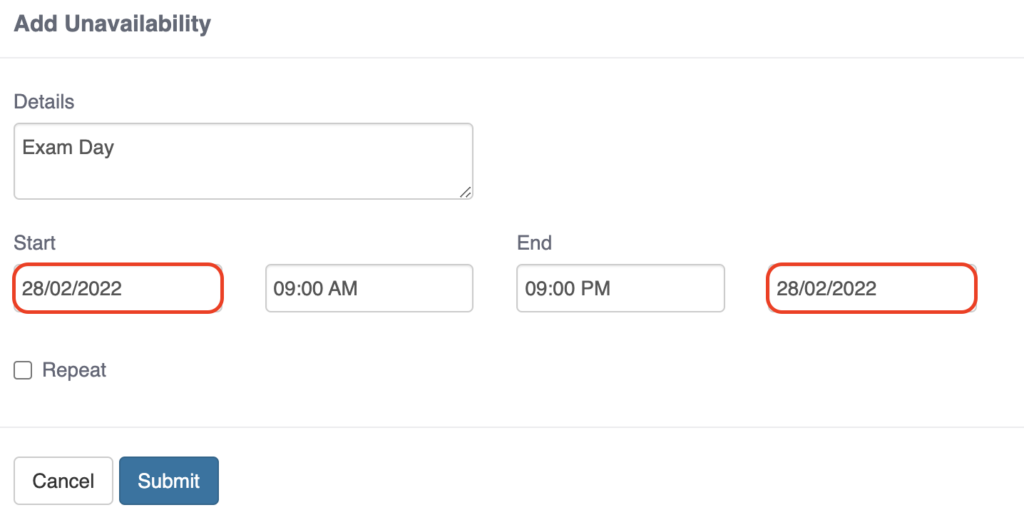
- Details: Enter why you are unavailable this day.
- If you are unavailable for just one day, select the same date in the Start & End boxes, and enter the times you are unavailable (See the example below)
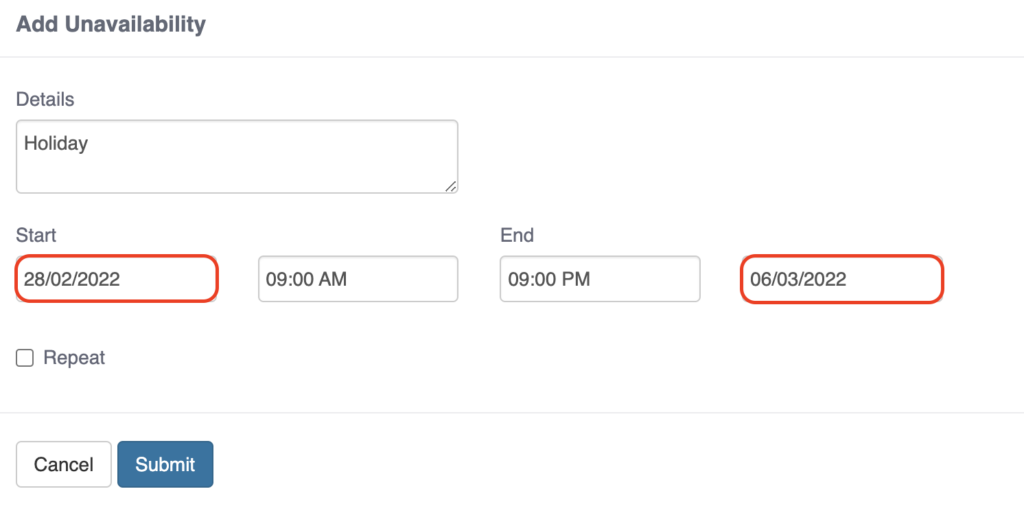
- If you are unavailable for multiple days in a row, select the start date & end dates, as well as the times you are unable to teach. (See the example below)
- Then press "Submit"
Your unavailability will present itself on the "Day" or "Week" View of your Teachworks Calendar as a dark grey block-out period.
My Lessons
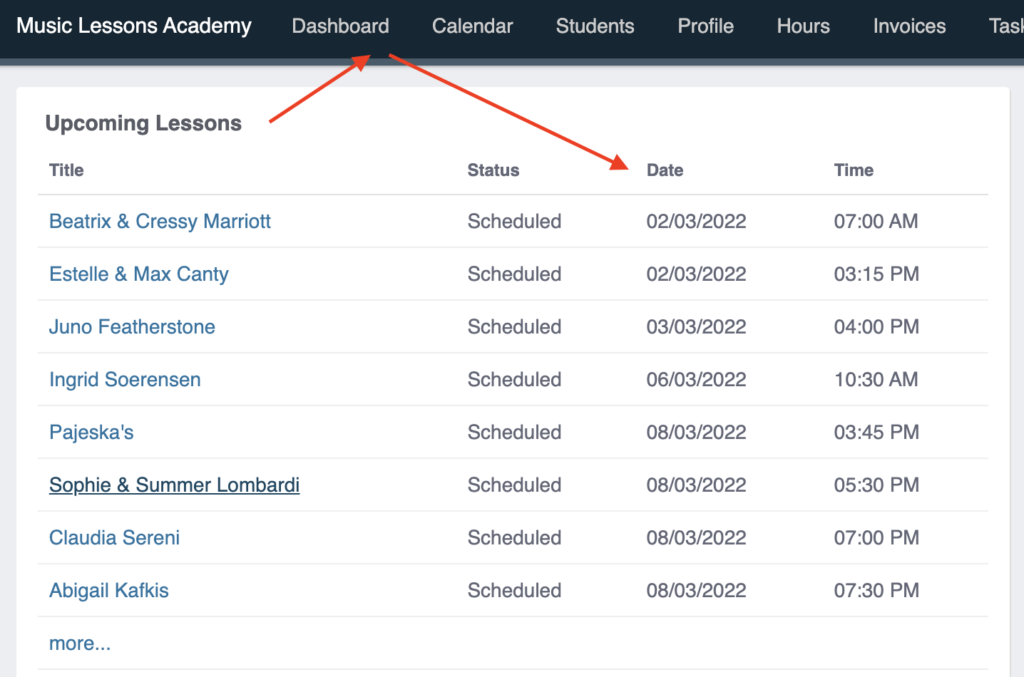
How to Check My Teaching Schedule
There are two places you can check your upcoming lessons & student information,
Dashboard:
- When you first log into Teachworks, your dashboard will appear.
- View the "Upcoming Lessons" box to see in list view your student's names, lesson time & lesson date.
Main Calendar:
From the top menu, select "Calendar". Select the view you prefer:
- "Calendar" shows a month, week or day view in timetable view of your lesson schedule
- "Location Calendar" shows in week view your lessons divided into "Online" or "Students Home"
- "Calendar List View" shows your lesson schedules in a weekly list view.
We predominately use the "Calendar" in the monthly or weekly view.
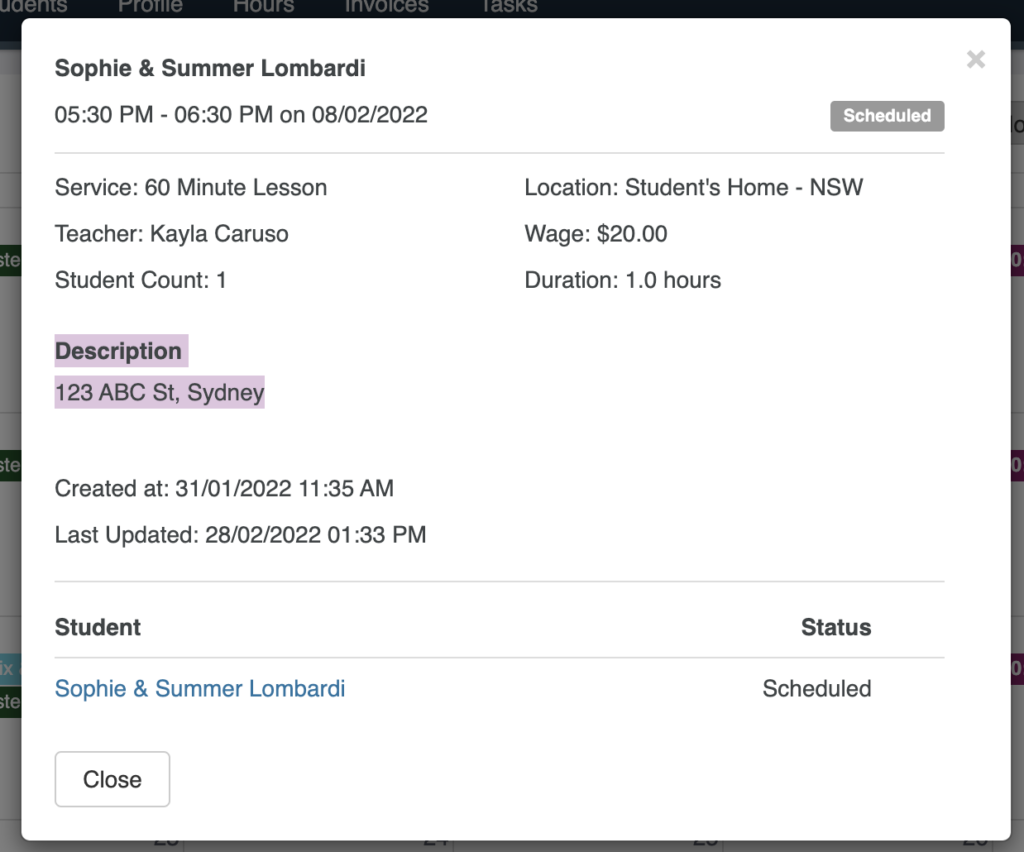
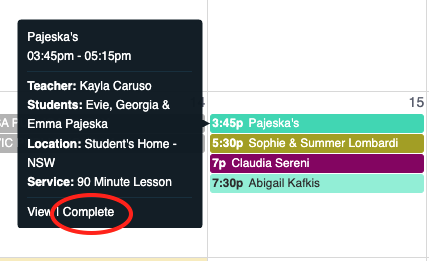
You can click on any lesson in the calendar to view the Duration, Location and Student Information.
Student Address:
- Click on the lesson in weekly or monthly view,
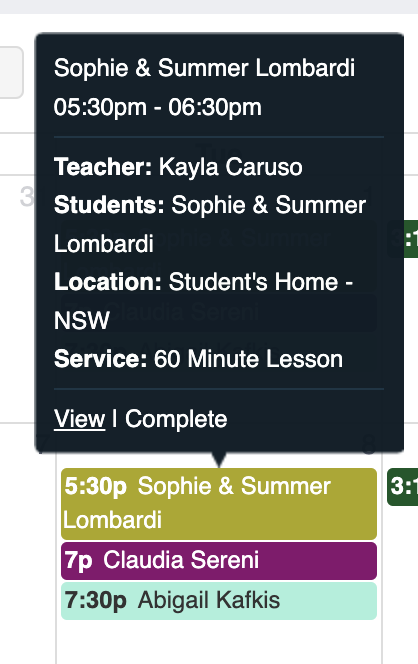
- On the grey popup box, select "View"
- On the white popup box, the Address will be written under the Description heading.
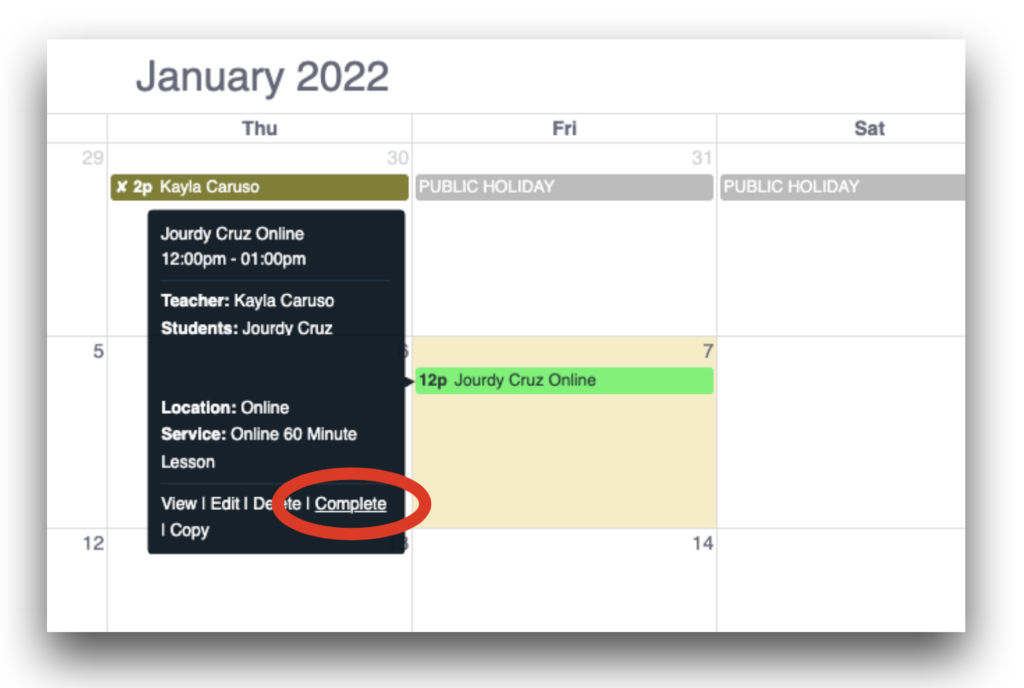
How to Mark Attendance & Add Lesson Notes
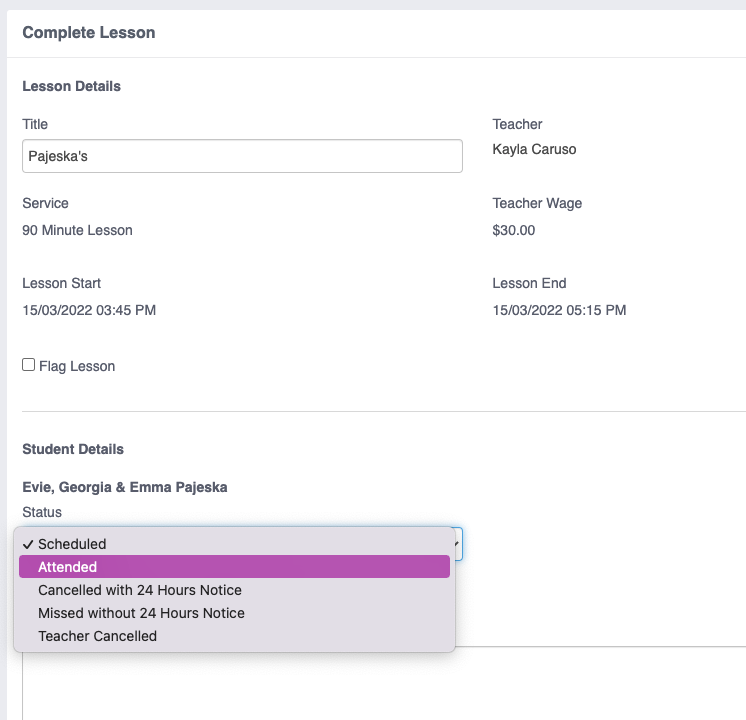
There are two ways you can mark attendance of your lessons. The first way is through the main calendar view. Select the lesson you’ve attended, and select “Complete”.
You will then need to change the status to either :
- “Attended” if you taught the lesson
- “Missed without 24 Hours Notice” if the student cancelled within 24 hours of the scheduled lesson
- “Cancelled with 24 Hours Notice” if the student cancelled and gave 24 hours notice
- "Teacher Cancelled" if you were the one to cancel the lesson.
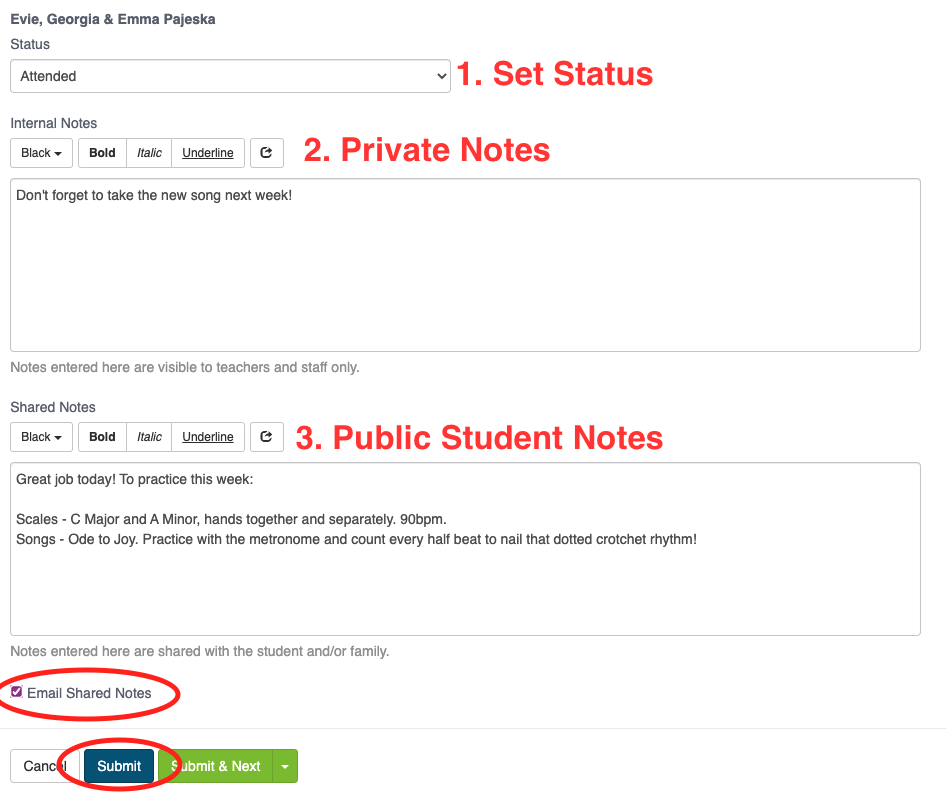
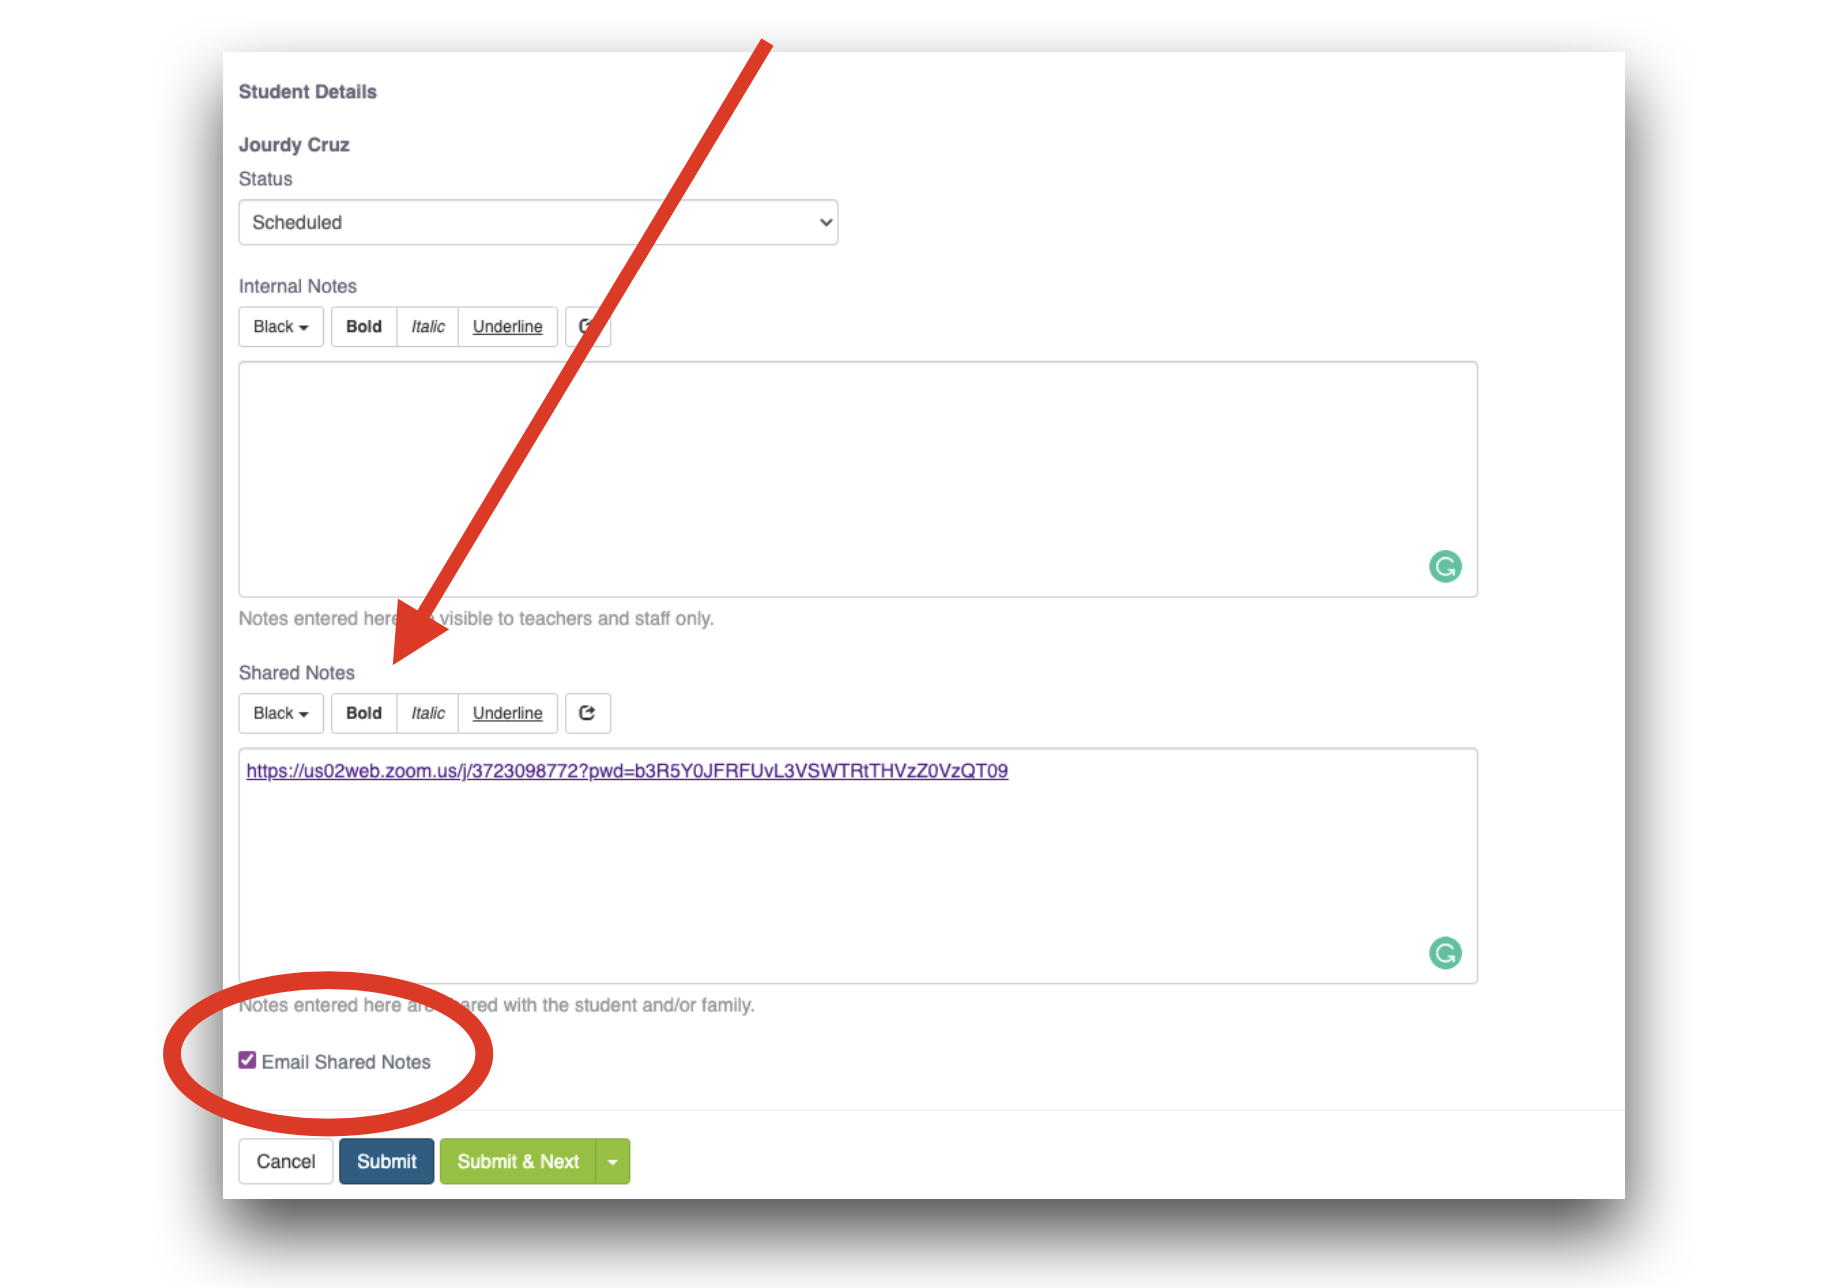
You can add any private lesson notes you want to keep for yourself in the “Internal Notes” text box.
You can also send lesson notes to your students through the “Shared Notes” text box. Once written, select the “email shared notes” checkbox for them to be sent to your student. Once you select Submit, you have marked your attendance!
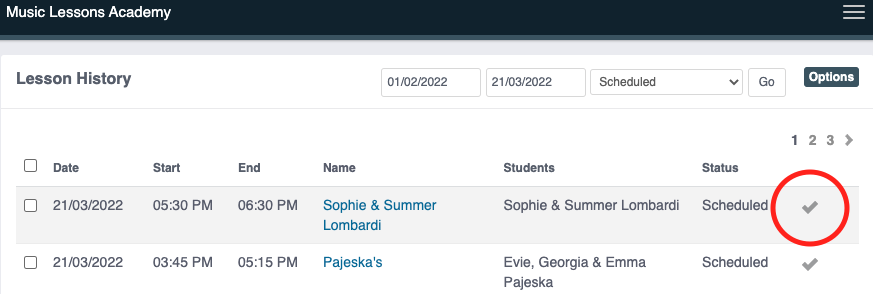
The second way to mark your attendance is through the dashboard. Your “Uncompleted Lessons” list displays all the lessons that need their attendance marked. Selecting “More” will show you a more detailed list. Select the Tick next to each student’s lesson to mark the attendance.
We suggest marking attendance each week as you create your invoices, as we can only process your invoice when your attendance is marked.
How to Set Up for Online Lessons
For a more comprehensive online set-up guide, click here.
To add your Zoom Invitation Link to your online lessons:
Log in and open your Teachworks Account. Go to the Main Calendar. Select the online lesson. From the pop up menu, select “Complete”.
Scroll down until you see the “Student Details” section.
In the “Shared Notes” Box, paste in your Zoom Link. Then, check the “Email Shared Notes” checkbox and press “Submit”.
How to Sync My Teachworks Calendar to My iPhone/Google/Mobile Calendar
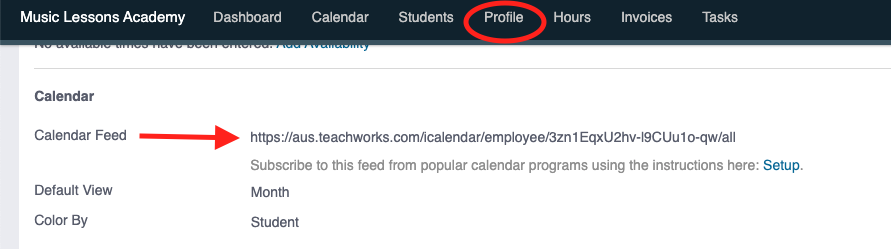
- On Teachworks, go to your "Profile" from the main menu
- Scroll down until you see the "Calendar" section
- Copy the link next to "Calendar Feed"
iCalendar (on iPhone/iPad)
- In the calendar app, choose Calendars > Add Calendar > Add Subscription Calendar
- Paste the calendar feed link, then select "Subscribe"
iCalendar (for Apple Mac)
- In the calendar app, choose File > New Calendar Subscription
- Paste the calendar feed link, then select "Subscribe"
Google Calendar
- Open Google Calendar
- On the left, next to "other calendars" select "Add > From URL"
- Paste the calendar feed link, then select "Add Calendar"
- The calendar appears on the left, under "Other Calendars"
Instructions for Yahoo Mail Calendar (Click Here)
Instructions for Microsoft/Outlook Calendar (Click Here)
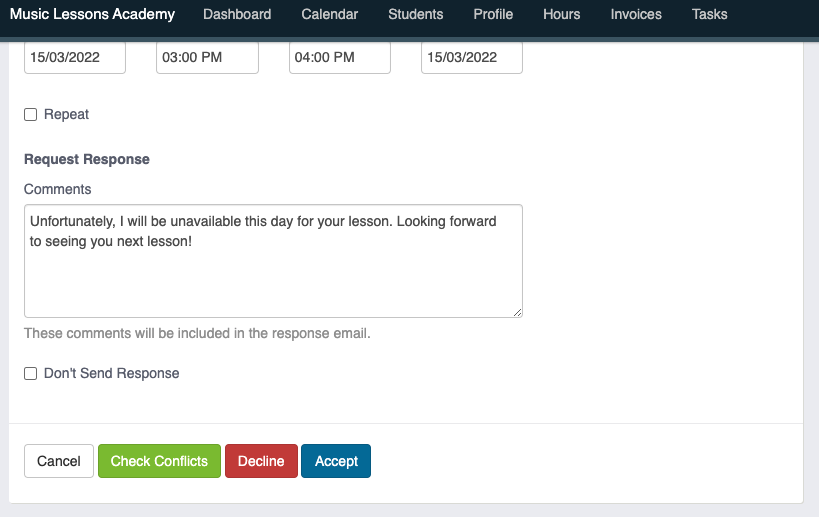
How to Accept or Decline Student's Lesson Requests
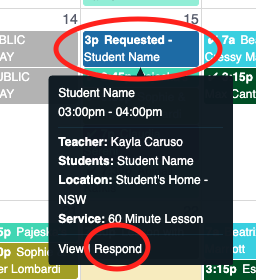
A lesson request occurs when a student requests to take a lesson with you that hasn't previously been scheduled in our Calendar.
- On your calendar, you will see a lesson titled "Requested"
- Select the lesson, and on the grey pop up box, select "Respond"
- Preview the information for the lesson request,
- If you are Accepting the Lesson: Select "Accept" at the bottom of the page
- If you are Declining the Lesson: Write a short response in the "comments box" to politely explain that you are unavailable for the lesson. Then select "Decline"
How to Flag an Unusual Lesson
If you spot something unusual on your Teachworks calendar, perhaps a lesson says it will be a 60-minute lesson but it is scheduled for 45 minutes, or if you are assigned a student that plays the saxophone and you are a piano teacher, you can now flag these unusual lessons to alert our bookings team.
- Select the lesson from the calendar, then select "Complete"
- On the attendance page, under the "Lesson Details" find the Flag Lesson checkbox
- Check the “Flag Lesson” box
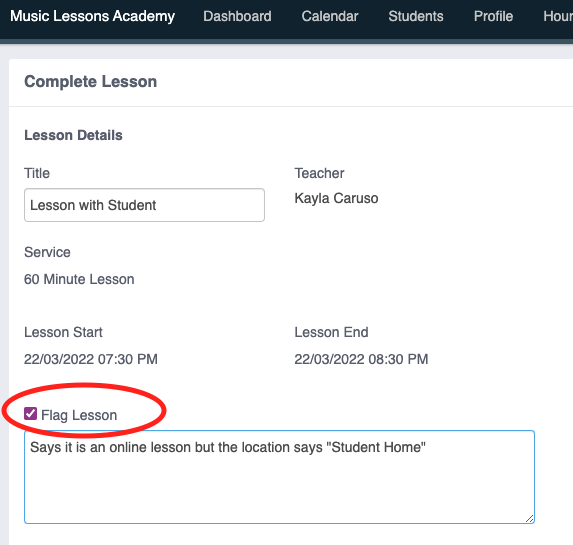
- Add any comments about the issue in the comments box
- Select Submit
- This will notify our bookings team to look at the lesson and make sure it is correctly scheduled.
Invoices
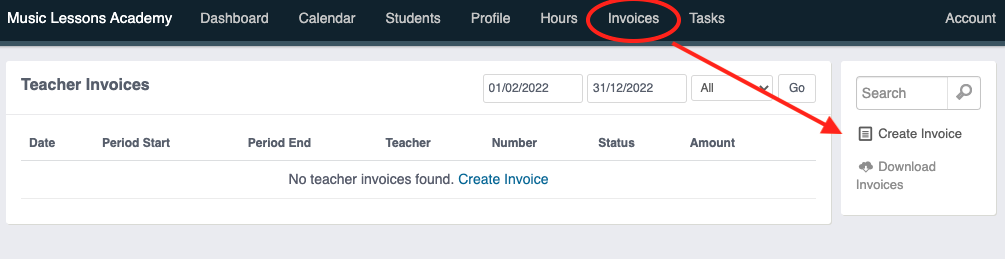
How to Create an Invoice
Please Note: You must update your attendance for all your lessons in order to create an invoice
- Select “Invoices” from the top menu
- Create Invoice on the right side menu.
- Your Business Number and address will automatically be added in the top textbox.
- Select the "Period Start" and "Period End" dates of your invoice to include all the lessons you are yet to be paid for.
- In the details/instructions box, please enter your bank account details.
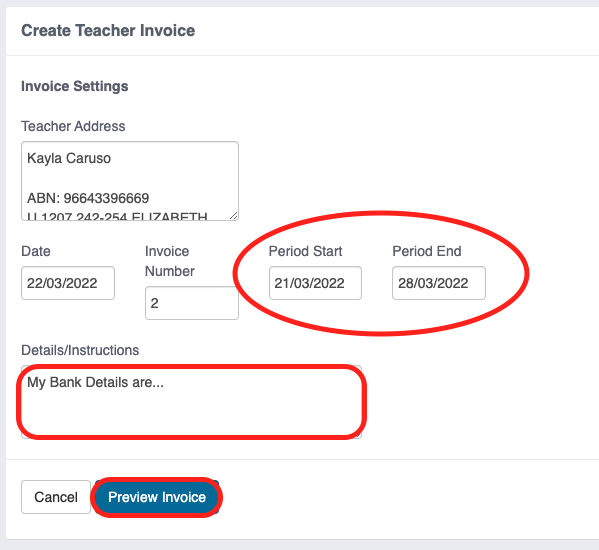
- Select Preview, all the un-invoiced lessons between the dates you selected will appear.
- Review it, then select “Create Invoice” and the invoice will automatically be sent to the company.
My Students
How to View My Student's Details
- Select "Students" from the main menu of Teachworks
- A list of your students will appear.
- If your student is a child, their Family names will be linked in brackets - eg. Student Name (Family Name)
- Select your student's Name
- Here you can find your student's Instrument, their experience level.
- If your student is transferred to you from a previous teacher, there will be student notes written in the "Notes & Communications" section of the student page.
How to View My Student's Family Details
- Select "Students" from the main menu of Teachworks
- A list of your students will appear.
- If your student is a child, their Family names will be linked in brackets - eg. Student Name (Family Name)
- Select the Family's Name from under the Student's Name
- Here you can find your student's address & contact details.
How to Track My Student's Progress Using the Repertoire Tracker
- From the main menu select "Students" then "Repertoire Tracker"
- Select "Add Repertoire" from the right side menu
- When adding a new song into the tracker, be sure to enter the following fields:
- Select your student
- Song Title
- Composer
- Difficulty
- Status as “In Progress”, until you can set it as “Completed”
- Date Started, and Date Completed once “Completed”
- If your student shares a lesson with their sibling / more than one student comes up under the same family name, add a note for which student this piece of repertoire belongs to!
- Then press Save.
![]()
Once you have completed a piece and need to update the Repertoire Tracker:
- Go to the tracker via "Students" > "Repertoire Tracker"
- Find the piece that was completed
- Select the pencil icon next to the piece
- Change the status to "Complete" then press "Save"